


Measuring your windows for blinds and shades is easy and we provide these measuring instructions to help make it even easier for you. Measuring instructions are intended for a single product covering a single window opening, unless stated otherwise. If you have any questions regarding how to measure properly for our products, or you have a unique window/mounting situation, then please contact us.
Important rules to follow while measuring your windows:
- Always use a steel measuring tape for accuracy.
- Write down WIDTH first then HEIGHT. Do not list them out of order.
- Measure ALL of your windows, even if they appear to be the same size.
- Never measure an existing blind/shade for your measurements.
There are two mount types to consider, Inside Mount and Outside Mount. Please note that mounting onto a door is considered an outside mount.
Inside Mount
|
|
Inside mounted blinds and shades are mounted within the window frame providing a clean, custom look. A great way to leave an attractive window trim exposed. Please note that if your mounting space is restricted in width or it is between two stationary objects then that is most likely also considered an inside mount because the inside mount deduction may be required for the product to fit.
|

To properly mount a blind inside the window's frame, your frame must be deep enough to
accommodate the mounting brackets. If the depth of your window's frame is not equal to or greater than the
minimum mounting depth, you will need to measure for an outside mount and mount your product outside the
window frame. The mounting depth must be unobstructed and flat for mounting the brackets. The brackets for this product
can be side mount, ceiling/top mount, or rear/wall mount. Center support brackets (included for blinds wider than 48") are
ceiling/top mount or rear/wall mount only.
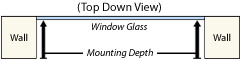
Minimum Inside Mounting Depth is the minimum depth required to mount a blind inside the window
opening. This depth allows for enough flat space for the brackets to be mounted. A portion of the blind and the brackets may
protrude from the window opening.
Flush Inside Mounting Depth is the depth required to mount a blind so that it is fully recessed inside
the window casing and no portion of the blind protrudes from the window frame. Obstructions such as window cranks, handles
and other items inside the window opening must be factored into your depth measurement.
|

|
|

|
Width
Measure the exact window opening width in at least THREE (3) places: top, middle, and bottom. Take the smallest/narrowest
of the 3 measurements (to the nearest 1/8th inch) and write it down. This is the exact width you will order.
Do not take any deductions from your measurement.
Height
Measure the exact height of the window opening in THREE (3) places: left, middle, right. The height should be measured from the top of
the opening down to the bottom of the opening or window sill. Take the largest/longest of the three measurements (to the nearest
1/8th inch). This is the exact height you will order.
Important: You must provide the smallest width measurement of the opening when ordering. If your window opening has a narrower width at any other location than where you measured, then measure that width.
Important: Do not take any deductions from your measurements. The manufacturing factory will make a 1/2" (+/- 3/16" variance)
deduction off the ordered width for the proper installation and operation of your blind. Do not increase the measured width to reduce the manufacturer deduction.
Obstacles: If your window has obstacles/obstructions such as window handles or cranks that can interfere with the operation of your inside mount blind, consider an Outside Mount.
|

|
|

|
Measure the window opening on the diagonal from corner to corner. First from the top left corner to the
bottom right corner and then from the top right corner to the bottom left corner. If the two
measurements differ by more than a 1/2" then it is recommended that you switch to an outside mount.
Please note: When measuring, do not be surprised if your windows are not exactly
square, many aren't. If they are a little out of square, it will probably not be noticeable.
|

|
|
|
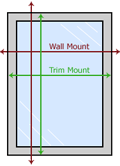
Inside Mount blinds have the option of either no side returns, inside mount side returns, or a custom side return size.
No Side Returns (Flush Inside Mount)
If your window depth (measured above) is greater than or equal to the "Flush Inside Mounting Depth" then you can choose this option.
The valance will be made to a width of 1/8" less than your window opening ordered width. The blind will be mounted so that the
valance is inside the window opening, either flush with the outside wall/trim or inset inside the opening if you have excess depth
and prefer the appearance.
Inside Mount Side Returns
If your window depth (measured above) is not deep enough for a flush inside mount or you want to mount the blind at the front edge of
the window opening then we recommend that you select this option. The valance will be made wider than the blind to acommodate the
side returns. The side returns will provide a finished look covering the sides and running back towards the wall or trim. Side returns
for this product are measured from the back of the valance to the edge of the side return, on the backside of the side return. Side return
size is 1/2".
Custom Side Returns
If you want a custom side return size, then you can take the mounting depth that you measured above and subtract it from 2 1/2".
The difference is the size you will order the Custom Side Return. This assumes that you will place the back of the bracket at the starting point of your depth measurement.
|
|

|
|
|
If you are mounting multiple blinds into one window opening then you can choose to have one shared common valance that covers the
headrails of all of the blinds. To measure for the valance width simply measure the exact width of the window opening at the top.
This is the exact width you will enter for the Valance Width. The factory will then make the appropriate size adjustments based on
the valance side returns option you selected.
Please note: Finished valance sizes over 96" wide will be center spliced (miter-cut) to avoid oversize
shipping charges. The miter-cut will allow the valance sections to connect for a more seamless appearance than a straight cut. Please
note which blinds will share this valance in the "Customer Notes" section of the product orderform.
|
|
Outside Mount
|
|
Outside mounted blinds are mounted to the wall or the window trim/molding outside of the window opening and cover
an area larger than the window itself. Outside mounts provide better light control and privacy. Perfect
for windows that lack the required depth for an inside mount.
|

|
|
|
Width
Measure the width of the area you wish to cover (left to right). We recommend that your measurement provides at least 3" of total overlap
wider than the window opening to ensure maximum light control, 1 1/2" on each side. This is the exact width you will order.
No deductions will be taken by the factory. Valance will be approx 1 1/2" wider than the headrail.
Height
Measure the height of the area you wish to cover (top to bottom). You must have the required minimum flat
mounting surface above the window opening for proper bracket mounting. Your height measurement must provide enough overlap to
accomodate the required mounting bracket space and to provide ample light control overlap below the bottom of the window or to a
the window sill. If you have a window sill that protrudes at the bottom of the window, adjust your height measurement so the blind rests on the sill.
Please note: The window opening width does not include any trim that is on the wall, around the outside of the window opening.
|

|
|||||||||||||||||||||||||||

|
To get an unobstructed view when your blind is raised/open you may choose to mount your blind higher so the stack is raised above the window opening.
To accomplish this, you will need to adjust your outside mount height measurement. Please refer to the table below for approximate
product stacking heights and add to your height measurement for the desired stack clearance.
Please note: The Lift & Lock Cordless lift adds 5/8" to the stacking height.
|
||||||||||||||||||||||||||

|
|
If you are mounting multiple blinds to cover one window opening then you can choose to have one shared common valance that covers the
headrails of all of the blinds. To measure for the valance width simply measure the exact total width of the area that you are covering
(from the outside edge of the left blind to the outside edge of the right blind).
This is the exact width you will enter for the Valance Width. The factory will then make the appropriate size adjustments based on
the valance side returns option you selected.
Measuring note: When measuring for multiple blinds to cover a total area please measure to allow for a
minimum gap of 1/4" between each blind for proper operation. For example: If the total outside mount width you want to cover is 84"
and you want three blinds to cover this area order the blinds as 27 7/8", 27 3/4", 27 7/8". This will provide a 1/4" gap between each
blind for proper operation. For clarification we are deducting 1/8" off the side of each blind that butts-up to another blind which
takes 1/8" off the left blind, 1/4" off the middle blind (it butts-up to two blinds), and 1/8" off the right blind. The shared common
valance width would be entered as 84". The valance itself will be made wider by the manufacturer to allow for the side returns to extend
beyond the brackets on the outside edges.
Please note: Finished valance sizes over 96" wide will be center spliced (miter-cut) to avoid oversize
shipping charges. The miter-cut will allow the valance sections to connect for a more seamless appearance than a straight cut.
|